|
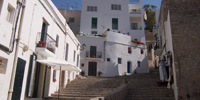
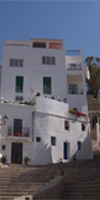
Pictures are an easy product to make for IMVU creators, they sell well to!, they might seem hard at first but once you have done one, you will be a master! Everyone has digital pictures, either from a camera or phone, they look great in your rooms and you can give them to your friends as awesome unique gifts. The main thing is to make sure your picture is the right size and to make an icon for the catalogue. many programs can do this however Windows has a built in program called Paint, and this can do it for you. Below I'm using paint as found in windows 7, but all versions of Windows have a version of it built in yours might look a little different, but it will still do the same job. To make your picture, I presume: You have signed up as a creator ( do that here ) You need about 700 real credits not promos I suggest you make a folder on your desktop and call it mypicture. Put the picture you want to use for imvu in this folder, and save everything we do below in this folder, makes it easy to find later! The instructions below are for a rectangular vertical picture ( higher than it is wide ), if you want to make a different shape, you can still follow these instructions, just alter the main picture size. Choose a mesh based roughly on the shape of the picture your going to use.
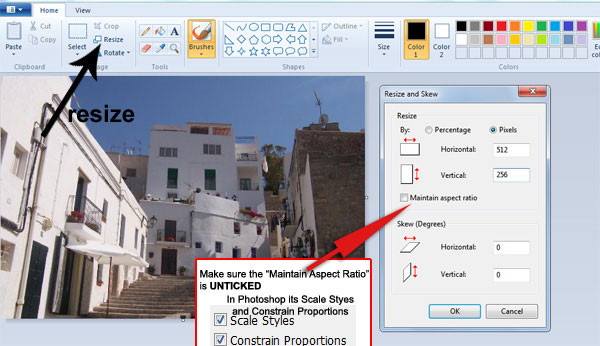
Part 1: Resizing your picture ( 2-20 minutes ) Ok lets resize the picture and make an icon for the catalogue.
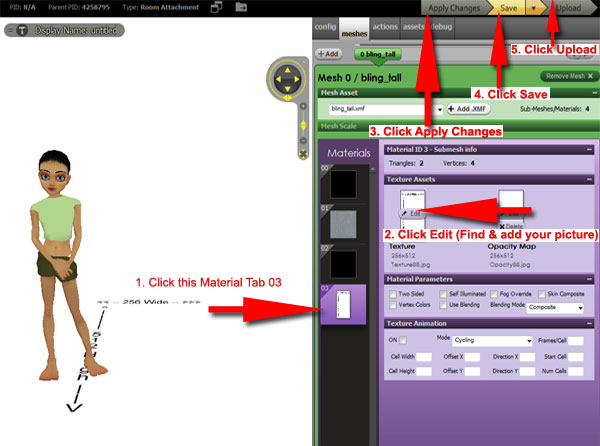
Click on Start, Go to programs, Click on Accessories. Paint should be in there Open paint, then click on file, open and locate your picture you want to use and click on it to open. Look at the top part of Paint and you should see the resize icon, click on resize, make sure its set to pixels and take the tick out of the maintain aspect, make the horizontal size 512 and the vertical 256 then click on file/ save as and save it as a jpg file ( second option ) just call it mypic and save it to the mypicture folder on your desktop. Next go back to your picture that's open in Paint and resize it again, remember to make sure its set to pixels and maintain aspect is unticked, this time make the size 100 horizontal and 80 vertical save this, file, save as , jpg file and call it myicon . Now you have your picture and an icon for the catalogue, you can now close paint. Part 2 : Creating your IMVU product. Click on this ( Derive from product ) and it should open the client. If it doesn't go to the bottom of the following page and click the Derive from product, link near the bottom of the page http://www.imvu.com/shop/product.php?products_id=4258795 Its usually takes a few seconds while the files are downloaded and then the client editor will open. The client will open two windows, on the left the product your working on, and on the right is where you can make changes. Don't touch anything just look on the right, this is the area where we make changes. Locate the tab in the centre called the materials tab.
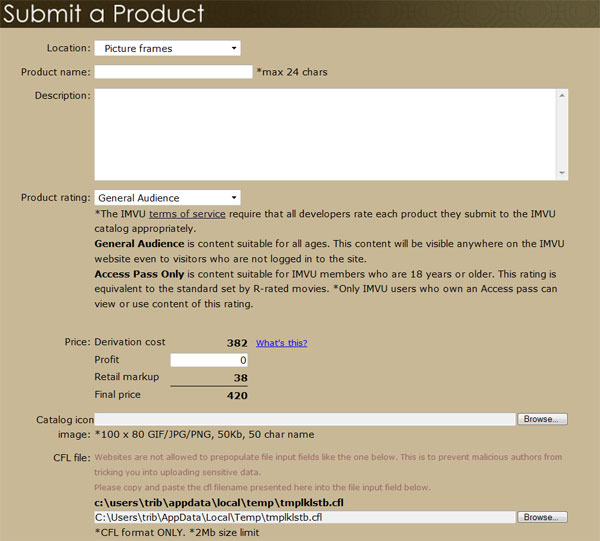
1. In the materials section click on the 3rd image down number 03 and it will be highlighted like in the example above. 2. Look in the middle of the highlighted area and you see the Texture Assets Tab, Click on the edit button. At this stage a window will open and all you do is browse to the picture you want to add, the big one we resized, select that and click open. 3. Now look up the top and click on the Apply Button, with any luck on the left side of the screen your picture should now be in the frame, if its not go back to step 2 and repeat, if it is follow on... btw pat yourself on the back we are 1/2 way there! 4. If you see your picture on the left, its now time to submit it, So the next step is hit the save button, and this will save your work. 5. Now you are ready to submit your picture, if you want a break, go for a smoke, scream at someone, another bottle of wine, a pee or what ever now is the time to do it. Once your back and ready.. Click The UPLOAD button Uploading Your New Product When you upload and submit a new product you will be presented with the following form, just start from the top and work your way down, 1. First give your picture a product name, 2. Give a description of your product. If your picture is adult related change the rating to Accesspass otherwise leave it as is. 3. Give your product a profit you will make if someone buys with real credits ( add 50 if your unsure ). 4.Catalogue Icon, click on browse and locate the small icon picture we made earlier, this must be exactly 100 wide and 80 high, if it is not then you will need to re make and ensure it is exactly that size.
5. The cfl file. Now this bit gets so many people confused. Copy the bolded text, then click on browse, and then paste in the text you just copied. Here's a little animation to show you that, Copy, Click Browse, Paste, then click Open.
You don't need to touch anymore settings, however if you want you can add keywords to help people find your product once its forsale, take the tick out of the derivable box to stop others deriving from it. Leave the compatibility settings alone At the bottom of the page is the submit button. When your ready. Click it.
With any luck you have just created your first product!!! The next page that opens will ask if you want to publish, if you do others will be able to see and buy it once it passes peer review, if you don't, then you and you alone will be able to see it in your inventory and rooms. Close down imvu completely, then restart it, and open your room, go to furniture and your picture should be in there. Under the name you called it!! You can also just refresh your furniture inventory when in a room. YAY ( Note your submit fee will be different to mine, being Tier 7 has is advantages :P )
|